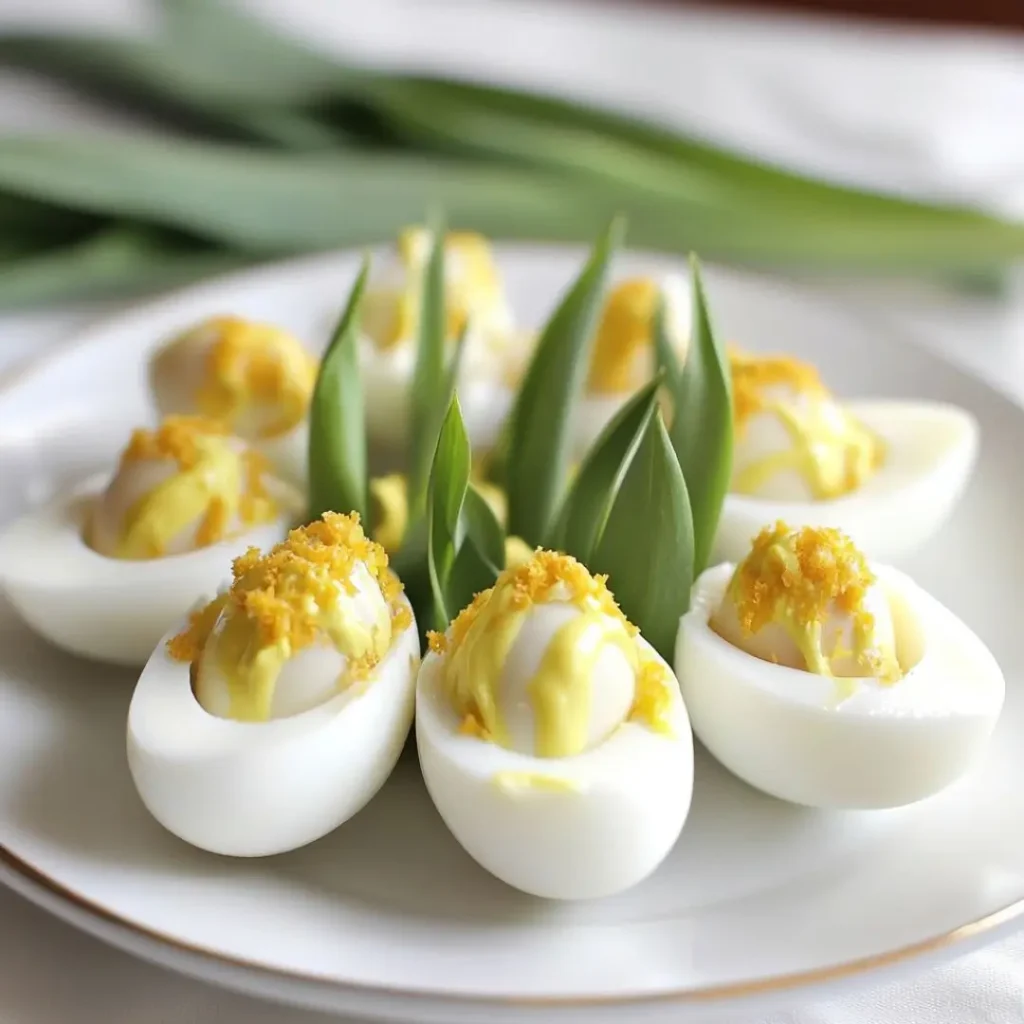
Looking for a party appetizer that’s as beautiful as it is delicious? These Deviled Egg Tulips are your answer. With their charming tulip-like shape and creamy deviled egg filling, they bring elegance, color, and just the right amount of whimsy to your table without requiring a floral arrangement.
Whether you’re hosting Easter brunch, a baby shower, or just want to impress guests with your creative flair, this recipe is a guaranteed conversation starter. Plus, it’s surprisingly simple to pull off and customizable to your heart’s content.
Why You’ll Love These Deviled Egg Tulips
- They’re edible bouquets – Eye-catching, adorable, and yes, totally devourable.
- Perfect for spring – Fresh, light, and seasonally stunning.
- No fancy tools needed – Just a paring knife and a little creativity.
- Fun to make with kids – Let them help fill or “plant” the tulips on a serving tray.
- Takes deviled eggs to the next level – Literally, a blooming upgrade.
They’re the kind of snack that disappears fast… right after everyone gets their photos.
Ingredients You’ll Need
You won’t need a trip to the florist just a few fridge and pantry staples. For full quantities, check the recipe card below.
- Hard-boiled eggs – White eggs work best for the tulip effect.
- Egg yolks – For the classic deviled egg filling.
- Mayonnaise – Makes the filling rich and creamy.
- Mustard – Adds that signature tang.
- Salt and pepper – For simple seasoning.
- Chives or green onions – These become your edible tulip “stems.”
- Paprika or dill (optional) – For garnish and flavor.
How to Make Deviled Egg Tulips
Step 1: Hard-Boil and Cool Your Eggs
Boil your eggs and cool them completely. You want the whites firm and easy to handle. Pro tip: slightly older eggs peel more easily.
Step 2: Create the Tulip Petals
Using a small paring knife, slice a zig-zag pattern around the middle of each egg cutting just deep enough to separate the top from the bottom without crumbling the white. Gently pull them apart to reveal the yolk inside.
Step 3: Make the Filling
Remove all yolks and place them in a bowl. Add mayo, mustard, salt, and pepper, then mash everything into a smooth, creamy filling. Adjust seasoning to taste.
Step 4: Fill Your Tulips
Spoon or pipe the yolk mixture back into the bottom half of each egg white. You can use a piping bag with a star tip for extra flair, or a zip-top bag with the corner snipped off.
Step 5: Assemble the Bouquet
Gently press the tops back onto the filled bottoms so they resemble blooming tulips. Insert a chive or green onion stalk into the base of each egg for a stem. Arrange the tulips on a platter like a bouquet, or “plant” them upright in a foam block or veggie tray for a wow-worthy presentation.
Estimated Nutrition
Per tulip (based on 12 tulips):
- Calories: 90
- Fat: 7g
- Protein: 5g
- Carbs: 1g
- Sugar: 0g
- Fiber: 0g
Preparation Time
- Prep Time: 25 minutes
- Cook Time: 10 minutes (for boiling eggs)
- Total Time: 35 minutes
Cooking Tips
- Want more color? Add a drop of beet or paprika powder to the filling for a pink hue.
- Don’t overcut the whites. A gentle zig-zag helps create the tulip shape without breaking the egg.
- Make ahead friendly! Prep the filling and eggs separately, then assemble just before serving.
And if a few eggs don’t look perfect? Call those your “abstract art tulips.” They still taste amazing.
Serving Suggestions
These Deviled Egg Tulips shine on any brunch or party spread. Serve them:
- On a platter with leafy greens as “soil”
- In mini glass jars or vases for an edible bouquet look
- Alongside fruit and cheese for a spring grazing board
You can even pop them into lunchboxes for a fun surprise!
Preparing Ahead and Storing
- Make ahead: Boil the eggs and prep the filling the night before. Store separately in airtight containers in the fridge.
- Assemble day of: For best presentation, assemble within a few hours of serving.
- Storage: Leftovers keep in the fridge for up to 2 days, but the tulip shape is best fresh.
Avoid freezing eggs don’t bounce back well from the cold!
Personal Story
The first time I made these Deviled Egg Tulips, my daughter insisted they were “too pretty to eat” but then ate four in a row. Now they’re a family tradition for spring parties and garden gatherings. They look impressive, but trust me, they’re easier than they seem and always get rave reviews.
FAQ: Deviled Egg Tulips
Do I have to use white eggs?
White eggs look best for that bright tulip effect, but brown eggs will work just fine they’ll just look more rustic.
Can I use store-bought hard-boiled eggs?
Absolutely! If you want to skip the boiling and peeling step, store-bought eggs are a great shortcut.
Can I make these without mustard?
Yes! You can use sour cream, Greek yogurt, or even a dash of vinegar for tang instead.
How do I keep the “stems” from falling out?
Use thicker chives or green onions, and gently insert them deep enough to stay put. A little dab of yolk mixture at the base helps glue them in.
What if I mess up the zigzag cut?
No worries! Just use a regular horizontal cut and fill like a traditional deviled egg still delicious, still festive.
Can I make them spicy?
Definitely. Add a touch of Sriracha, cayenne, or horseradish to the filling for some heat.
What kind of platter should I use?
Try arranging them on a round plate with leafy greens or herbs, or line a baking dish with foil and floral accents for a bouquet effect.
Are these gluten-free?
Yes! These Deviled Egg Tulips are naturally gluten-free just check your mustard and mayo labels to be sure.
Final Thoughts Deviled Egg Tulips
When you need something cute, clever, and tasty all in one bite, Deviled Egg Tulips deliver. They’re perfect for springtime entertaining, totally customizable, and sure to impress your guests whether you’re serving brunch or just looking to brighten up your table.
Don’t forget to grab the full recipe card below with all the measurements and steps. These little tulips are waiting to bloom on your table! 🌷🥚💛
Deviled Egg Tulips
These Deviled Egg Tulips are almost too pretty to eat! A delightful spring appetizer that turns a classic deviled egg into a beautiful edible bouquet.Equipment
Ingredients
Main Ingredients
- 6 hard-boiled eggs
- 3 tbsp mayonnaise
- 1 tsp mustard
- salt and pepper to taste
- 12 chives or green onions for stems
- paprika or dill for garnish (optional)
Instructions
Notes
These tulip-shaped deviled eggs are best assembled right before serving. You can prep the eggs and filling a day ahead and store them separately in the fridge.


